Saturday, January 4, 2014

SOLVED: Firefox Sometimes Starts in Safe Mode

Occasionally when Firefox starts up, this screen shows up.


Another symptom of this problem is in Explorer. Open Explorer and attempt to select a file by clicking on the filename. All files above the file you are trying to select are also automatically highlighted. Only your selected file should be chosen


SOLUTION:
Most likely, your keyboard SHIFT key is sticky. Lift gently on the each SHIFT key and attempt to launch Firefox. If it starts normally, simply clean your keyboard, focusing on the SHIFT key you were lifting when it began behaving normally again.

 - BG & BB

Sunday, May 19, 2013

SOLVED: Firefox - Cannot CUT/COPY/PASTE

[Updated 19 May 2013]

Just like you, we sometimes wish to copy text from a web page. For the past couple of days, we have been unable to paste anything in Firefox on one of our laptops. COPY seems to work (not greyed out, acts like it normally does, no indication anything is out of the ordinary). PASTE is completely not an option (greyed out, Ctrl-V does not do the trick, no reaction to any attempt to paste something into any text field). This seemed an excellent opportunity to track down the culprit and document what happened.

There are several reasons Firefox users can no longer cut/copy/paste. One of the easiest to blame is a very old bug that creeps its way into your world occasionally (or more correctly, a series of bugs). While there may be something to it, it's very unlikely the true cause of the problem. Mozilla has more or less killed these bugs, as there have been no sightings in several years.

More likely the culprits are third-party add-ons or adware/spyware. Even if you believe you have no add-ons, it's best to double-check occasionally. Some sites will install tracking software or worse without you knowing, despite your (and your browser's) best efforts to block them.

Adware, spyware, and tracking software can interfere with the copy/paste operations in your browser. Pushow is one of these. Thankfully, it is also one of the quickest and simplest to remove. Here are the instructions for removing this specific adware program.

One-by-one, we disabled each add-on and restarted Firefox. Rather than working alphabetically, we started with the most likely candidates, including recently added or updated ones. Since we only had a few, it was a quick process. Recently updated add-on "Element Hiding Helper for Adblock Plus 1.2.3" seemed to be our culprit. Normally well-behaved and extremely useful, as soon as we disabled this add-on and restarted Firefox, we got back our ability to copy and paste. You don't have to restart Firefox when disabling/enabling this add-on, so we decided to keep it around and simply disable it until we need to copy/paste something.

Unfortunately, this turned out to be a red herring. There is no clear evidence pointing to the culprit. Your best bet is to keep the number of add-ons you use to a minimum and to double-check your search engine every time you search from the built-in search box. If you don't recognize the search provider logo, it could be Pushow. Be diligent. Early detection is the key to keeping these people from collecting and tracking your information.


NOTE:  As always, we will update this article if we find any other causes for this very annoying problem. If our current list of solutions do not work for you, we recommend you use the Check4Change add-on. Highlight the [Updated: ] line at the top of the page. As soon as we change that date, you will be notified.

HOWTO: Remove Pushow or AdvertMen Adware From Windows Machines

The adware program known as "Pushow" or "AdvertMen" is easily removed from your Windows computer by deleting the files. Follow the instructions provided below. It only takes a moment to free yourself of the annoying pop-up ads and the underlying tracking and reporting. If you're comfortable with the Command Line, it's only three lines of typing!

NOTE:  The files you see in the screenshots are fake. We created them as examples, so the file sizes and parts of the names will definitely be different. If the filename starts with the word "pushow," remove it.

EASIEST METHOD
1. Make notes or open a different browser to this page.
2. Close Firefox.
3. Open Windows Explorer
3. Navigate to the system directory, in bold below.
         c:\windows\system32
4. Look for any files with a name beginning with pushow. You should see something like this.


5. Delete those files permanently or move them to your trash bin and then empty it.
6. That's it! You're done.


EASY METHOD
1. Make notes or open a different browser to this page.
2. Close Firefox.
3. Open a Command Prompt window.
4. Type the following commands.
          cd c:\windows\system32
          dir pushow*
          del pushow*
          dir pushow*
5. Your window should look very much like this.


6. That's it! You're done.

Sunday, January 27, 2013

HOW TO: Set a Windows Program To Always Be Run As Administrator


Some programs require special administrative authorization to execute properly, no matter the logged-on user. Installers and updaters are great examples of programs that need elevated administrative permission, especially when installing something for use by all users.

Because this exposes your entire system to the program, make sure you absolutely trust the program completely before granting it administrator privileges.

Once you've decided to allow a program to always run with administrative privileges, just use the steps below to make it happen.


These steps are valid for Windows Vista, Windows 7, and Windows 8.
1. Using Windows Explorer, navigate to the desired file.
2. Right click on the entry for the desired file. Select Properties, found at the bottom of the popup list.
3. Select (by left click) the Compatibility tab.
4. Optional Click on the [Change settings for all users] button.
5. Check the last checkbox in the dialog window, in the "Run this program as an Administrator."6. Click the [OK] button. If you chose to enable for all users, you'll need to click [OK] a second time.


It's a little more complicated in Windows XP. Keep watching this space. We'll be adding the XP version soon.

Sunday, January 6, 2013

SOLVED: LINUX - Unable to Update, Add, or Remove Programs and MaxReports is reached already

While updating Ubuntu (and many other Linux systems), the update manager crashed. The error message probably references some broken or missing dependencies. There is also a message about MaxReports having been reached. The fix is a simple 3-step process requiring you to use a terminal (command line) window. First, you must fix the package manager itself. Second, you'll need to reinstall the program that caused the problem. The final step is to remove the reports causing the MaxReports error message. Once you've done those three things, you should have no problem updating (Step 4 below).

Here are some examples of the error messages you might see. We've listed several so you can get a feel for identifying the package causing the errors.

EXAMPLE ERROR MESSAGES:
Package dependency not met. Package Name = kdebase-workspace-data

   dpkg: error processing kdebase-workspace-data (--configure):
   dependency problems - leaving unconfigured
   dpkg: dependency problems prevent configuration of kdebase-workspace-bin


STEP 1. FIX BROKEN PACKAGE MANAGER
   sudo dpkg --configure -a


STEP 2a. REINSTALL OR REMOVE PROBLEMATIC PROGRAM(S)
Once you've identified the name of the program(s) causing problems, use the example to remove and reinstall it. This is usually straight-forward and, once the package manager issue is resolved, runs without a hitch. The first line will produce a lot of status messages, then it will ask if you want to continue. The answer is Yes (or Y). You'll get some more lines of messages. When it has successfully completed, issue the second command. You will again see a bunch of status messages, followed by another continue question. Again, answer Yes (or Y). The package installation will continue, finishing with an installation successful message.

   sudo apt-get remove
   sudo apt-get install

STEP 2b. REPEAT STEP 2a UNTIL ALL BAD PACKAGES ARE REINSTALLED

If there are multiple packages, start at the top of the list. ONLY reinstall one package at at time. After each attempt, try to run an update (Step 4) until the original update problem is resolved. Since the purpose of Step 3 is just to make room for more crash reporting data, it's okay to skip it and come back later.


STEP 3. FIX MAXREPORTS ERROR
It's a good idea to resolve this issue, but it's not going to keep your system from running.There does not seem to be any automated cleanup here, so you'll have to clear it manually. We provide the method we used below.

Apport is the crash reporting system. The error message, "No apport report written because MaxReports is reached already:" is a little vague, and alarms you for no good reason. It does, however, prevent new crash reports from being written. If you have another crash, no relevant information will be recorded, making troubleshooting immensely more difficult.


CLEAN UP CRASH REPORTS DIRECTORIES
In your terminal window, type the following commands.

   cd /var/crash
   ls

At this point, you'll see a list of the crash report files. You may choose to remove all or part of them. Older files are always a safe bet to delete, as this data becomes obsolete rather quickly. Use the examples below as a guide for removing unwanted files.

Example commands to remove files
   sudo rm *            Remove all files in this directory
   sudo rm 2012-08*     Remove only files with names beginning with 2012-08

Next, you'll want to clear the directory in which program-specific crash information is stored. Here are the commands to clean that up.

   cd /tmp
   ls apport.*
 
You will be presented with a list of applications that have crash data. You may again wish to remove some or all of these files.

That's it. You've successfully cleaned up your crash data directories. Now you can update your system.

STEP 4. UPDATE SYSTEM
   sudo apt-get update
   sudo apt-get install -f


Be sure to bookmark this page, as you may have to repeat it some time in the future.

Friday, November 16, 2012

SOLVED: Touchpad Stopped Working


Recently, my personal laptop stopped responding to touchpad input. I took the thing apart, hoping to find it had come unplugged or something had shorted out, knowing I'd just invalidated my warranty. Nope, it looked clean, attached, and showed no evidence of a problem. Stumped, I searched the web and found lots of unanswered questions about what to do.

However, I found a hint that ultimately led to another one of those "Doh!" moments. Many modern laptops have a way of disabling the built-in touchpad (on purpose!).Boy, did I feel silly when I realized I'd taken apart a perfectly good computer when I had inadvertently shut off the touchpad myself! Oh well, live and learn.

As you can see below, it's easy to accidentally switch off the touchpad. Now, all you have to do is figure out how to switch it back on.


Here is an example of a "soft" switch, meaning it's controlled by a keystroke. In the case of this Acer Aspire 5552, you hold down the [Fn] key and press the [F7] key. Notice the placement is between the Mute key and the Video Output selection key.


This is what a hardware switch might look like. It almost seems camouflaged by being between the keyboard and the touchpad on this hp Mini 2333. On other machines, it's located near other switches such as the WiFi switch.


Look around and/or check your owner's manual if you're having trouble locating it. Not all laptops feature a way to turn off the touchpad, but it's definitely worth investigating ... before you tear your laptop apart.

Failing that, here are some other suggestions that don't involve opening the laptop.
1. Uninstall/reinstall the driver.
2. Check the touchpad software (System Tray) to see if it's enabled and working properly.
3. Unplug any peripheral devices & try the touchpad again.
4. Unplug the power supply (especially if it's a replacement) & try the touchpad again.
5. Check the manufacturers' websites & fora for hints, updates, recall notices.


[Thanks to gehesse on TomsHardware.Com for the hint!]

HOW TO: Find Linux Distro and Version Information

There are many reasons you might want to pull up information about the installed operating system. System administrators monitor hundreds of machines. Many new and used computers come pre-loaded with Linux. Machines sometimes sit untouched for weeks or months. The list goes on and on.

Most of the time, you're most interested in finding the The easiest way to get all the information you want is through two commands, uname and cat. When you use -a with the uname command, you get back all the information uname "knows" how to gather. The cat command displays the contents of a text file. In this case, it's the release file located in the etc folder off the root (/)directory. This is a standard file installed by most flavors of Linux. The name changes, depending on the distribution you have, but the standard calls for the filename to end with the word release (therefore the * wild card in the filename below). You can combine the two commands on one line by joining them with double ampersands (&&), as below, to get everything at once. Ready to give it a go?

First, find and open a Terminal window, usually in the Accessories category on a standard desktop. In Unity-style desktops, start typing the word terminal in the search box and it'll pop right up.

When the Terminal window opens, you are faced with a large empty box, usually black, containing a blinking cursor. There is nothing to fear here. Simply type the following characters exactly as you see them and press the Return or Enter key.

uname -a && cat /etc/*release

What you will get back is similar to the example below. The command line prompt is user1@computer1:~$. Some of the output looks a lot like gobbledy-gook, so we've provided a gobbledy-gook-to-English translation at the bottom. Once you have an idea of what you're seeing in the output, it becomes easier to pick out the information you seek.

user1@computer1:~$ uname -a && cat /etc/*release

Linux computer1 2.6.37.6-0.7-default #1 SMP Mon Oct 29 13:01:22 PDT 2012 i686 Intel(R) Core(TM)2 Duo CPU     E6750  @ 2.66GHz GenuineIntel GNU/Linux
openSUSE 11.4 (i686)
VERSION = 11.4
CODENAME = Celadon


TRANSLATION

COMPUTER NAME: computer1
LOGGED-ON USER: user1
DISTRIBUTION NAME: openSUSE
VERSION: 11.4, aka Celadon
# BITS: 32-bit
.. .. .. .. 32-bit OS is indicated by i686  (or any iXXX number: i586, i486, i386, etc.)
.. .. .. .. 64-bit Linux is indicated by x86_64 instead of i686
CPU: Intel Core2 Duo running at 2.66GHz
LINUX KERNEL: 2.6.37.6-0.7-default

Thursday, November 15, 2012

MUST HAVE: Our Favorite Android Apps

[Updated 11 August 2013]

In alphabetical order, these are the apps we find most useful for our Android devices.
App Name (Publisher)

Advanced Task Killer (Rechild)
        Allows you to kill runaway apps and/or services.

Aldiko Book Reader (Aldiko Systems)
        Nice, simple eReader with access to a large supply of free books.

AndExplorer (LyseSoft)
       Basic, straightforward file explorer.

AppMgr III - App2SD (Sam Lu)
       Good way to manage your apps. Moves apps to SD card, but also advises which ones can be moved safely.

Avast! Mobile Security (Avast Software)
       Recently shown to be the most effective app in its category !!!

Barcode Scanner (Zxing Team)
        Point-N-Shoot. Handy when shopping & browsing. Supports QR, UPC, & many more.

Barnacle Wifi Tether (Szym.Net)  * Requires Root *
        Connect your WiFi-capable devices to your Internet-connected Android device. Easy setup.

Bluetooth File Transfer (Medieval Software)
         Move files quickly & easily between Bluetooth-enabled devices.

Classic Notes (Fluffy Delusions)
         Standard notepad with some nice features. Allows file imports, a feature we think is a must-have.

Dictionary.com (Dictionary.com)
         Instant Android access to one of the more popular English dictionary sites.

FedEx Mobile (FedEx)
         Track your FedEx packages.

Free Books & Stories - Wattpad (Wattpad.Com)
         Another simple eReader with access to a large supply of free books.

Kitchen Timer (Roberto Leinardi)
         Supports multiple timers simultaneously. Easy to use. Not just for cooking!

Opera Mobile (Opera Software ASA)
         Most sophisticated browser app to date. Still not as good as desktop browsers yet.

Quick Settings (HalfBit)
         Quick access to the settings you use most. Customizable & intuitive.

UPS Mobile (UPS) 
         Track your UPS packages.

USPS Mobile (USPS)
         Various services, including tracking your USPS packages.

YouTube (YouTube)
         Bring viral videos to your Android phone.

Weather Bug (The Weather Channel)
         Customizable access to weather in the places you hold dear. Select multiple cities & flip through them.

HOW TO: Locate the ESN | IMEI | MEID (Unique Serial Number Identifier) On A Device

When activating a new device yourself, you will be asked for the ESN, IMEI, or MEID of the device. This is simply the serial number used by your carrier to uniquely identify your device. If you don't know where to find it, you've come to the right place. There are several places to look. Some of these places will depend on the type of device you're using.


Any Device
Original Packaging
The first place to look, no matter what type of device you have, is on the package it came in. Most boxes feature the serial number prominently, because a lot of retail stores try to scan in the serial number when you purchase the device. Of course, if you threw away the packaging or have a used or refurbished device, this might not be an option.

Under the Battery
If your device is a phone, WiFi Hotspot, or one of the few tablets with an accessible battery, try looking around or under the battery.
- Turn off your device
- Remove the battery cover and look for the label
- If you still don't see it, remove the battery and look underneath


Android Devices
From the Home Screen, go to Settings -> About Phone | Tablet | Device -> Status.


iPhone | iPad
Go to Settings -> General -> About

The iPhone 3, iPhone 3GS, iPhone 4, and iPhone 4S all call it the IMEI/IMEID. It's printed on the SIM card tray.

The MEID for the iPhone 4 is a 14-digit number.
The MEID for the iPhone 4S is a 14-digit combination of letters and numbers.

The iPhone 5 also calls it the MEID. It will be the first 14 digits of the 15-digit number engraved on the case.


Windows
Stay tuned for more info about Windows 8 phones. We're researching this one. So far, all we've found is that there's a label under the battery, like most other devices.

HOW TO: Activate a Pre-Paid Virgin Mobile Phone


Virgin Mobile's phone activation process is very easy and straight-forward, once you understand the proper sequence of events. The first couple of times we did this, we got the sequence wrong and ended up calling Customer Support to bail us out (which they did). Now, we get it right every time because it's posted here on the Digital Playbook.

NOTE: If you are activating a Broadband2Go device (aka Hotspot), please refer to the documentation that came with your device. It has vastly different instructions from these steps.

Things you will need:
- Virgin Mobile phone
- Internet-connected device (your home computer will do nicely)
- Hex MEID (where to find this)
- Payment method (credit/debit card, top-up card, or PayPal)


1. From an Internet-connected device (such as your home computer, netbook or tablet), point your browser to Virgin's mobile website and select your country. This takes you to the appropriate local Virgin Mobile website for your location.
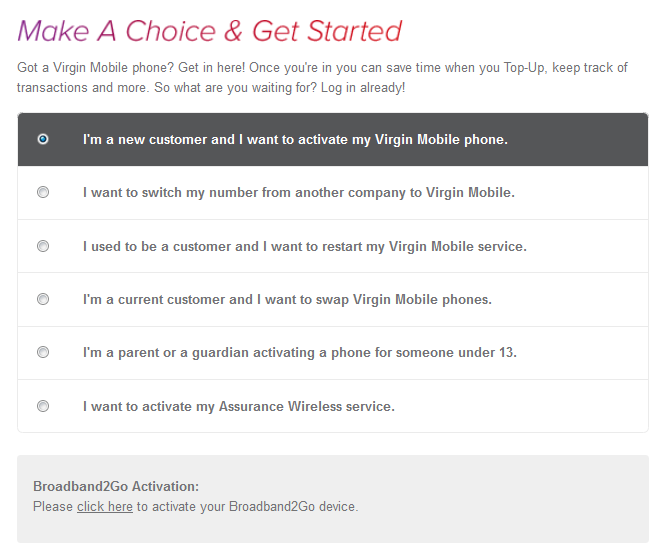
2. Select Activate. This is located in different places for each country, so you might want to use your browser's FIND function (Ctrl-F). You are then prompted to select one of the following options. If you are activating a WiFi Mobile Hotspot, STOP HERE. These steps will not work for those devices. Check the documentation that came with your Hotspot. We'll be posting as many as we can in the very near future, so keep your eyes out for that page.


3. Provide the required information on each screen and click. The required information also differs by country. Basically, they want to know who and where you are, and the identity (MEID) of the device you want to activate.
 
If you forget to fill in a required field, you'll see the same screen. Scroll to the top and read the red messages, which tell you which fields you missed. Once you've provided all the information required by a screen, it will successfully advance to the next screen when you clickagain.

4. A couple of screens later, you'll get a successful activation message. At this point, you can choose to add money to your new account. If you decide to do this, be sure you select the correct payment type and fill in all the required information. Again, you will get a success message once your payment has been recorded by Virgin Mobile.

5. Write down your new MSID & phone number. You'll get a confirmation text message, but it's a good idea to write them down now anyway. Be sure to write down the PIN you chose, as well. Virgin Mobile uses your phone number and PIN to uniquely identify you whenever you have any dealings with them, such as when you call Customer Support.

6. Turn on the device, if it's not already on.

7. From the Home screen, find and press the Activate icon. It looks like a red power button symbol. In a few seconds or so, your device activation will be complete. Another message will appear, this time on your newly-activated device. If you've added money to the account, you can now use your new device.

Congratulations! You have successfully activated your device. Now, go forth and bog it down with apps! Need some suggestions? Check out our list of Must-Have Apps for Android, iPhone/iPad (Coming Soon), and Windows (Coming Soon) devices.