Friday, November 16, 2012

SOLVED: Touchpad Stopped Working


Recently, my personal laptop stopped responding to touchpad input. I took the thing apart, hoping to find it had come unplugged or something had shorted out, knowing I'd just invalidated my warranty. Nope, it looked clean, attached, and showed no evidence of a problem. Stumped, I searched the web and found lots of unanswered questions about what to do.

However, I found a hint that ultimately led to another one of those "Doh!" moments. Many modern laptops have a way of disabling the built-in touchpad (on purpose!).Boy, did I feel silly when I realized I'd taken apart a perfectly good computer when I had inadvertently shut off the touchpad myself! Oh well, live and learn.

As you can see below, it's easy to accidentally switch off the touchpad. Now, all you have to do is figure out how to switch it back on.


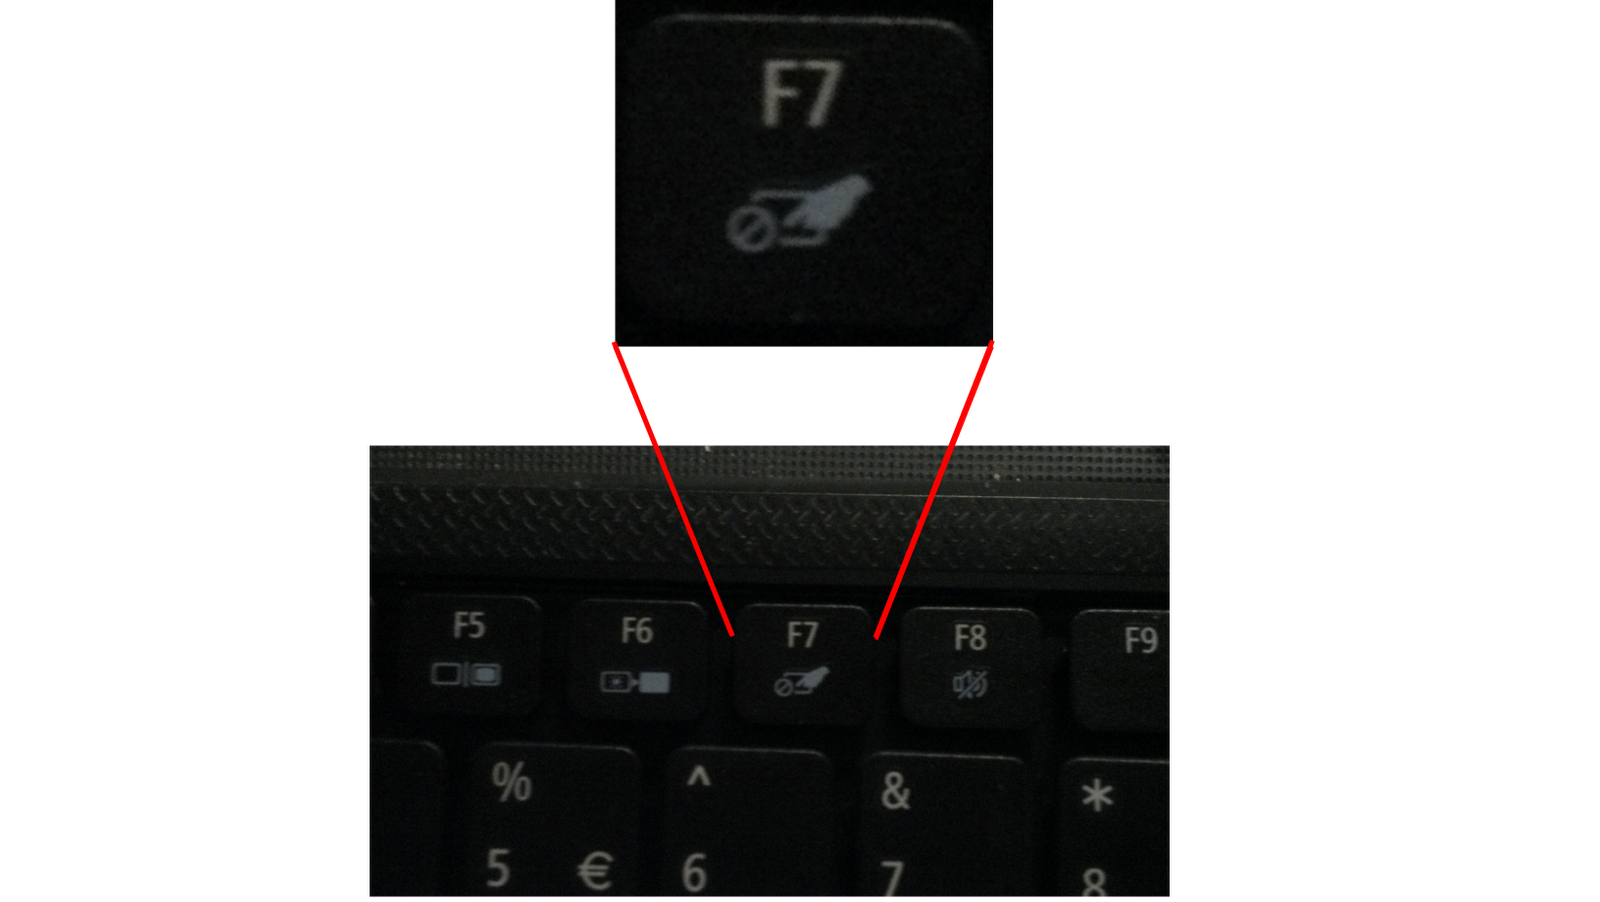
Here is an example of a "soft" switch, meaning it's controlled by a keystroke. In the case of this Acer Aspire 5552, you hold down the [Fn] key and press the [F7] key. Notice the placement is between the Mute key and the Video Output selection key.


This is what a hardware switch might look like. It almost seems camouflaged by being between the keyboard and the touchpad on this hp Mini 2333. On other machines, it's located near other switches such as the WiFi switch.


Look around and/or check your owner's manual if you're having trouble locating it. Not all laptops feature a way to turn off the touchpad, but it's definitely worth investigating ... before you tear your laptop apart.

Failing that, here are some other suggestions that don't involve opening the laptop.
1. Uninstall/reinstall the driver.
2. Check the touchpad software (System Tray) to see if it's enabled and working properly.
3. Unplug any peripheral devices & try the touchpad again.
4. Unplug the power supply (especially if it's a replacement) & try the touchpad again.
5. Check the manufacturers' websites & fora for hints, updates, recall notices.


[Thanks to gehesse on TomsHardware.Com for the hint!]

HOW TO: Find Linux Distro and Version Information

There are many reasons you might want to pull up information about the installed operating system. System administrators monitor hundreds of machines. Many new and used computers come pre-loaded with Linux. Machines sometimes sit untouched for weeks or months. The list goes on and on.

Most of the time, you're most interested in finding the The easiest way to get all the information you want is through two commands, uname and cat. When you use -a with the uname command, you get back all the information uname "knows" how to gather. The cat command displays the contents of a text file. In this case, it's the release file located in the etc folder off the root (/)directory. This is a standard file installed by most flavors of Linux. The name changes, depending on the distribution you have, but the standard calls for the filename to end with the word release (therefore the * wild card in the filename below). You can combine the two commands on one line by joining them with double ampersands (&&), as below, to get everything at once. Ready to give it a go?

First, find and open a Terminal window, usually in the Accessories category on a standard desktop. In Unity-style desktops, start typing the word terminal in the search box and it'll pop right up.

When the Terminal window opens, you are faced with a large empty box, usually black, containing a blinking cursor. There is nothing to fear here. Simply type the following characters exactly as you see them and press the Return or Enter key.

uname -a && cat /etc/*release

What you will get back is similar to the example below. The command line prompt is user1@computer1:~$. Some of the output looks a lot like gobbledy-gook, so we've provided a gobbledy-gook-to-English translation at the bottom. Once you have an idea of what you're seeing in the output, it becomes easier to pick out the information you seek.

user1@computer1:~$ uname -a && cat /etc/*release

Linux computer1 2.6.37.6-0.7-default #1 SMP Mon Oct 29 13:01:22 PDT 2012 i686 Intel(R) Core(TM)2 Duo CPU     E6750  @ 2.66GHz GenuineIntel GNU/Linux
openSUSE 11.4 (i686)
VERSION = 11.4
CODENAME = Celadon


TRANSLATION

COMPUTER NAME: computer1
LOGGED-ON USER: user1
DISTRIBUTION NAME: openSUSE
VERSION: 11.4, aka Celadon
# BITS: 32-bit
.. .. .. .. 32-bit OS is indicated by i686  (or any iXXX number: i586, i486, i386, etc.)
.. .. .. .. 64-bit Linux is indicated by x86_64 instead of i686
CPU: Intel Core2 Duo running at 2.66GHz
LINUX KERNEL: 2.6.37.6-0.7-default

Thursday, November 15, 2012

MUST HAVE: Our Favorite Android Apps

[Updated 11 August 2013]

In alphabetical order, these are the apps we find most useful for our Android devices.
App Name (Publisher)

Advanced Task Killer (Rechild)
        Allows you to kill runaway apps and/or services.

Aldiko Book Reader (Aldiko Systems)
        Nice, simple eReader with access to a large supply of free books.

AndExplorer (LyseSoft)
       Basic, straightforward file explorer.

AppMgr III - App2SD (Sam Lu)
       Good way to manage your apps. Moves apps to SD card, but also advises which ones can be moved safely.

Avast! Mobile Security (Avast Software)
       Recently shown to be the most effective app in its category !!!

Barcode Scanner (Zxing Team)
        Point-N-Shoot. Handy when shopping & browsing. Supports QR, UPC, & many more.

Barnacle Wifi Tether (Szym.Net)  * Requires Root *
        Connect your WiFi-capable devices to your Internet-connected Android device. Easy setup.

Bluetooth File Transfer (Medieval Software)
         Move files quickly & easily between Bluetooth-enabled devices.

Classic Notes (Fluffy Delusions)
         Standard notepad with some nice features. Allows file imports, a feature we think is a must-have.

Dictionary.com (Dictionary.com)
         Instant Android access to one of the more popular English dictionary sites.

FedEx Mobile (FedEx)
         Track your FedEx packages.

Free Books & Stories - Wattpad (Wattpad.Com)
         Another simple eReader with access to a large supply of free books.

Kitchen Timer (Roberto Leinardi)
         Supports multiple timers simultaneously. Easy to use. Not just for cooking!

Opera Mobile (Opera Software ASA)
         Most sophisticated browser app to date. Still not as good as desktop browsers yet.

Quick Settings (HalfBit)
         Quick access to the settings you use most. Customizable & intuitive.

UPS Mobile (UPS) 
         Track your UPS packages.

USPS Mobile (USPS)
         Various services, including tracking your USPS packages.

YouTube (YouTube)
         Bring viral videos to your Android phone.

Weather Bug (The Weather Channel)
         Customizable access to weather in the places you hold dear. Select multiple cities & flip through them.

HOW TO: Locate the ESN | IMEI | MEID (Unique Serial Number Identifier) On A Device

When activating a new device yourself, you will be asked for the ESN, IMEI, or MEID of the device. This is simply the serial number used by your carrier to uniquely identify your device. If you don't know where to find it, you've come to the right place. There are several places to look. Some of these places will depend on the type of device you're using.


Any Device
Original Packaging
The first place to look, no matter what type of device you have, is on the package it came in. Most boxes feature the serial number prominently, because a lot of retail stores try to scan in the serial number when you purchase the device. Of course, if you threw away the packaging or have a used or refurbished device, this might not be an option.

Under the Battery
If your device is a phone, WiFi Hotspot, or one of the few tablets with an accessible battery, try looking around or under the battery.
- Turn off your device
- Remove the battery cover and look for the label
- If you still don't see it, remove the battery and look underneath


Android Devices
From the Home Screen, go to Settings -> About Phone | Tablet | Device -> Status.


iPhone | iPad
Go to Settings -> General -> About

The iPhone 3, iPhone 3GS, iPhone 4, and iPhone 4S all call it the IMEI/IMEID. It's printed on the SIM card tray.

The MEID for the iPhone 4 is a 14-digit number.
The MEID for the iPhone 4S is a 14-digit combination of letters and numbers.

The iPhone 5 also calls it the MEID. It will be the first 14 digits of the 15-digit number engraved on the case.


Windows
Stay tuned for more info about Windows 8 phones. We're researching this one. So far, all we've found is that there's a label under the battery, like most other devices.

HOW TO: Activate a Pre-Paid Virgin Mobile Phone


Virgin Mobile's phone activation process is very easy and straight-forward, once you understand the proper sequence of events. The first couple of times we did this, we got the sequence wrong and ended up calling Customer Support to bail us out (which they did). Now, we get it right every time because it's posted here on the Digital Playbook.

NOTE: If you are activating a Broadband2Go device (aka Hotspot), please refer to the documentation that came with your device. It has vastly different instructions from these steps.

Things you will need:
- Virgin Mobile phone
- Internet-connected device (your home computer will do nicely)
- Hex MEID (where to find this)
- Payment method (credit/debit card, top-up card, or PayPal)


1. From an Internet-connected device (such as your home computer, netbook or tablet), point your browser to Virgin's mobile website and select your country. This takes you to the appropriate local Virgin Mobile website for your location.

2. Select Activate. This is located in different places for each country, so you might want to use your browser's FIND function (Ctrl-F). You are then prompted to select one of the following options. If you are activating a WiFi Mobile Hotspot, STOP HERE. These steps will not work for those devices. Check the documentation that came with your Hotspot. We'll be posting as many as we can in the very near future, so keep your eyes out for that page.


3. Provide the required information on each screen and click. The required information also differs by country. Basically, they want to know who and where you are, and the identity (MEID) of the device you want to activate.
 
If you forget to fill in a required field, you'll see the same screen. Scroll to the top and read the red messages, which tell you which fields you missed. Once you've provided all the information required by a screen, it will successfully advance to the next screen when you clickagain.

4. A couple of screens later, you'll get a successful activation message. At this point, you can choose to add money to your new account. If you decide to do this, be sure you select the correct payment type and fill in all the required information. Again, you will get a success message once your payment has been recorded by Virgin Mobile.

5. Write down your new MSID & phone number. You'll get a confirmation text message, but it's a good idea to write them down now anyway. Be sure to write down the PIN you chose, as well. Virgin Mobile uses your phone number and PIN to uniquely identify you whenever you have any dealings with them, such as when you call Customer Support.

6. Turn on the device, if it's not already on.

7. From the Home screen, find and press the Activate icon. It looks like a red power button symbol. In a few seconds or so, your device activation will be complete. Another message will appear, this time on your newly-activated device. If you've added money to the account, you can now use your new device.

Congratulations! You have successfully activated your device. Now, go forth and bog it down with apps! Need some suggestions? Check out our list of Must-Have Apps for Android, iPhone/iPad (Coming Soon), and Windows (Coming Soon) devices.

Sunday, November 11, 2012

HOW TO: Connect to FREE Hotspots from any WiFi-enabled device


It seems nearly every business and many cities offer free hotspots these days. Connecting to them is not always as straightforward as it might seem, however. We spent many a minute trying to troubleshoot connections before realizing what was going on. Once we figured that out, we came up with the following steps, which we always follow when using someone else's internet connection.

- First, make sure you are connected to the correct hotspot. It doesn't hurt to ask someone for the correct name of the hotspot you wish to use. If it's password protected, make sure you spell it exactly the way it is given to you. Passwords are ALWAYS case-sensitive.

- Next, open a browser to your favorite website. The actual site doesn't matter. It will likely be hijacked by your host. Don't panic. This is normal. Most free hotspots require you to agree to their Terms of Use, and some even require a valid email address, before they will allow you to use their internet connection. Some make you figure out the two-word code before allowing you to proceed. Usually, the host simply wants to make sure you're not a robot and you're not doing something illegal. Some government hosts have more stringent terms, like restricting your use to a specific purpose.  We recommend you read the entire user agreement before you click the 'OK' button.

- When the host site does give you the green light, usually a new page welcoming you to their free hotspot site, you are free to move about the cabin. At this point, the host will grant access to your applications. Now's the time to launch the app(s) you want to run.