Friday, November 16, 2012
SOLVED: Touchpad Stopped Working
Recently, my personal laptop stopped responding to touchpad input. I took the thing apart, hoping to find it had come unplugged or something had shorted out, knowing I'd just invalidated my warranty. Nope, it looked clean, attached, and showed no evidence of a problem. Stumped, I searched the web and found lots of unanswered questions about what to do.
However, I found a hint that ultimately led to another one of those "Doh!" moments. Many modern laptops have a way of disabling the built-in touchpad (on purpose!).Boy, did I feel silly when I realized I'd taken apart a perfectly good computer when I had inadvertently shut off the touchpad myself! Oh well, live and learn.
As you can see below, it's easy to accidentally switch off the touchpad. Now, all you have to do is figure out how to switch it back on.
Here is an example of a "soft" switch, meaning it's controlled by a keystroke. In the case of this Acer Aspire 5552, you hold down the [Fn] key and press the [F7] key. Notice the placement is between the Mute key and the Video Output selection key.
This is what a hardware switch might look like. It almost seems camouflaged by being between the keyboard and the touchpad on this hp Mini 2333. On other machines, it's located near other switches such as the WiFi switch.
Look around and/or check your owner's manual if you're having trouble locating it. Not all laptops feature a way to turn off the touchpad, but it's definitely worth investigating ... before you tear your laptop apart.
Failing that, here are some other suggestions that don't involve opening the laptop.
1. Uninstall/reinstall the driver.
2. Check the touchpad software (System Tray) to see if it's enabled and working properly.
3. Unplug any peripheral devices & try the touchpad again.
4. Unplug the power supply (especially if it's a replacement) & try the touchpad again.
5. Check the manufacturers' websites & fora for hints, updates, recall notices.
[Thanks to gehesse on TomsHardware.Com for the hint!]
HOW TO: Find Linux Distro and Version Information
There are many reasons you might want to pull up information about the installed operating system. System administrators monitor hundreds of machines. Many new and used computers come pre-loaded with Linux. Machines sometimes sit untouched for weeks or months. The list goes on and on.
Most of the time, you're most interested in finding the The easiest way to get all the information you want is through two commands, uname and cat. When you use -a with the uname command, you get back all the information uname "knows" how to gather. The cat command displays the contents of a text file. In this case, it's the release file located in the etc folder off the root (/)directory. This is a standard file installed by most flavors of Linux. The name changes, depending on the distribution you have, but the standard calls for the filename to end with the word release (therefore the * wild card in the filename below). You can combine the two commands on one line by joining them with double ampersands (&&), as below, to get everything at once. Ready to give it a go?
First, find and open a Terminal window, usually in the Accessories category on a standard desktop. In Unity-style desktops, start typing the word terminal in the search box and it'll pop right up.
When the Terminal window opens, you are faced with a large empty box, usually black, containing a blinking cursor. There is nothing to fear here. Simply type the following characters exactly as you see them and press the Return or Enter key.
What you will get back is similar to the example below. The command line prompt is user1@computer1:~$. Some of the output looks a lot like gobbledy-gook, so we've provided a gobbledy-gook-to-English translation at the bottom. Once you have an idea of what you're seeing in the output, it becomes easier to pick out the information you seek.
COMPUTER NAME: computer1
LOGGED-ON USER: user1
DISTRIBUTION NAME: openSUSE
VERSION: 11.4, aka Celadon
# BITS: 32-bit
.. .. .. .. 32-bit OS is indicated by i686 (or any iXXX number: i586, i486, i386, etc.)
.. .. .. .. 64-bit Linux is indicated by x86_64 instead of i686
CPU: Intel Core2 Duo running at 2.66GHz
LINUX KERNEL: 2.6.37.6-0.7-default
Most of the time, you're most interested in finding the The easiest way to get all the information you want is through two commands, uname and cat. When you use -a with the uname command, you get back all the information uname "knows" how to gather. The cat command displays the contents of a text file. In this case, it's the release file located in the etc folder off the root (/)directory. This is a standard file installed by most flavors of Linux. The name changes, depending on the distribution you have, but the standard calls for the filename to end with the word release (therefore the * wild card in the filename below). You can combine the two commands on one line by joining them with double ampersands (&&), as below, to get everything at once. Ready to give it a go?
First, find and open a Terminal window, usually in the Accessories category on a standard desktop. In Unity-style desktops, start typing the word terminal in the search box and it'll pop right up.
When the Terminal window opens, you are faced with a large empty box, usually black, containing a blinking cursor. There is nothing to fear here. Simply type the following characters exactly as you see them and press the Return or Enter key.
uname -a && cat /etc/*release
user1@computer1:~$ uname -a && cat /etc/*release
Linux computer1 2.6.37.6-0.7-default #1 SMP Mon Oct 29 13:01:22 PDT 2012 i686 Intel(R) Core(TM)2 Duo CPU E6750 @ 2.66GHz GenuineIntel GNU/Linux
openSUSE 11.4 (i686)
VERSION = 11.4
CODENAME = Celadon
TRANSLATION
COMPUTER NAME: computer1
LOGGED-ON USER: user1
DISTRIBUTION NAME: openSUSE
VERSION: 11.4, aka Celadon
# BITS: 32-bit
.. .. .. .. 32-bit OS is indicated by i686 (or any iXXX number: i586, i486, i386, etc.)
.. .. .. .. 64-bit Linux is indicated by x86_64 instead of i686
CPU: Intel Core2 Duo running at 2.66GHz
LINUX KERNEL: 2.6.37.6-0.7-default
Thursday, November 15, 2012
MUST HAVE: Our Favorite Android Apps
[Updated 11 August 2013]
App Name (Publisher)
Advanced Task Killer (Rechild)
Allows you to kill runaway apps and/or services.
Aldiko Book Reader (Aldiko Systems)
Nice, simple eReader with access to a large supply of free books.
Allows you to kill runaway apps and/or services.
Aldiko Book Reader (Aldiko Systems)
Nice, simple eReader with access to a large supply of free books.
AndExplorer (LyseSoft)
Basic, straightforward file explorer.
AppMgr III - App2SD (Sam Lu)
Good way to manage your apps. Moves apps to SD card, but also advises which ones can be moved safely.
Avast! Mobile Security (Avast Software)
Recently shown to be the most effective app in its category !!!
Barcode Scanner (Zxing Team)
Point-N-Shoot. Handy when shopping & browsing. Supports QR, UPC, & many more.
Barnacle Wifi Tether (Szym.Net) * Requires Root *
Connect your WiFi-capable devices to your Internet-connected Android device. Easy setup.
Bluetooth File Transfer (Medieval Software)
Barnacle Wifi Tether (Szym.Net) * Requires Root *
Connect your WiFi-capable devices to your Internet-connected Android device. Easy setup.
Bluetooth File Transfer (Medieval Software)
Move files quickly & easily between Bluetooth-enabled devices.
Classic Notes (Fluffy Delusions)
Standard notepad with some nice features. Allows file imports, a feature we think is a must-have.
Dictionary.com (Dictionary.com)
Instant Android access to one of the more popular English dictionary sites.
Classic Notes (Fluffy Delusions)
Standard notepad with some nice features. Allows file imports, a feature we think is a must-have.
Dictionary.com (Dictionary.com)
Instant Android access to one of the more popular English dictionary sites.
FedEx Mobile (FedEx)
Track your FedEx packages.
Free Books & Stories - Wattpad (Wattpad.Com)
Another simple eReader with access to a large supply of free books.
Kitchen Timer (Roberto Leinardi)
Supports multiple timers simultaneously. Easy to use. Not just for cooking!
Free Books & Stories - Wattpad (Wattpad.Com)
Another simple eReader with access to a large supply of free books.
Kitchen Timer (Roberto Leinardi)
Supports multiple timers simultaneously. Easy to use. Not just for cooking!
Opera Mobile (Opera Software ASA)
Most sophisticated browser app to date. Still not as good as desktop browsers yet.
Quick Settings (HalfBit)
Quick access to the settings you use most. Customizable & intuitive.
Quick Settings (HalfBit)
Quick access to the settings you use most. Customizable & intuitive.
UPS Mobile (UPS)
Track your UPS packages.
USPS Mobile (USPS)
Various services, including tracking your USPS packages.
YouTube (YouTube)
Bring viral videos to your Android phone.
Weather Bug (The Weather Channel)
Customizable access to weather in the places you hold dear. Select multiple cities & flip through them.
USPS Mobile (USPS)
Various services, including tracking your USPS packages.
YouTube (YouTube)
Bring viral videos to your Android phone.
Weather Bug (The Weather Channel)
Customizable access to weather in the places you hold dear. Select multiple cities & flip through them.
HOW TO: Locate the ESN | IMEI | MEID (Unique Serial Number Identifier) On A Device
When activating a new device yourself, you will be asked for the ESN, IMEI, or MEID of the device. This is simply the serial number used by your carrier to uniquely identify your device. If you don't know where to find it, you've come to the right place. There are several places to look. Some of these places will depend on the type of device you're using.
Any Device
Original Packaging
The first place to look, no matter what type of device you have, is on the package it came in. Most boxes feature the serial number prominently, because a lot of retail stores try to scan in the serial number when you purchase the device. Of course, if you threw away the packaging or have a used or refurbished device, this might not be an option.
Under the Battery
If your device is a phone, WiFi Hotspot, or one of the few tablets with an accessible battery, try looking around or under the battery.
- Turn off your device
- Remove the battery cover and look for the label
- If you still don't see it, remove the battery and look underneath
Android Devices
From the Home Screen, go to Settings -> About Phone | Tablet | Device -> Status.
iPhone | iPad
Go to Settings -> General -> About
The iPhone 3, iPhone 3GS, iPhone 4, and iPhone 4S all call it the IMEI/IMEID. It's printed on the SIM card tray.
The MEID for the iPhone 4 is a 14-digit number.
The MEID for the iPhone 4S is a 14-digit combination of letters and numbers.
The iPhone 5 also calls it the MEID. It will be the first 14 digits of the 15-digit number engraved on the case.
Windows
Stay tuned for more info about Windows 8 phones. We're researching this one. So far, all we've found is that there's a label under the battery, like most other devices.
Labels:
activation,
android phone,
apple phone,
Configuration,
esn,
HowTo,
imei,
iPad,
iPhone,
meid,
phone,
serial number,
smartphone,
Tablet,
windows phone
HOW TO: Activate a Pre-Paid Virgin Mobile Phone
Virgin Mobile's phone activation process is very easy and straight-forward, once you understand the proper sequence of events. The first couple of times we did this, we got the sequence wrong and ended up calling Customer Support to bail us out (which they did). Now, we get it right every time because it's posted here on the Digital Playbook.
NOTE: If you are activating a Broadband2Go device (aka Hotspot), please refer to the documentation that came with your device. It has vastly different instructions from these steps.
Things you will need:
- Virgin Mobile phone
- Internet-connected device (your home computer will do nicely)
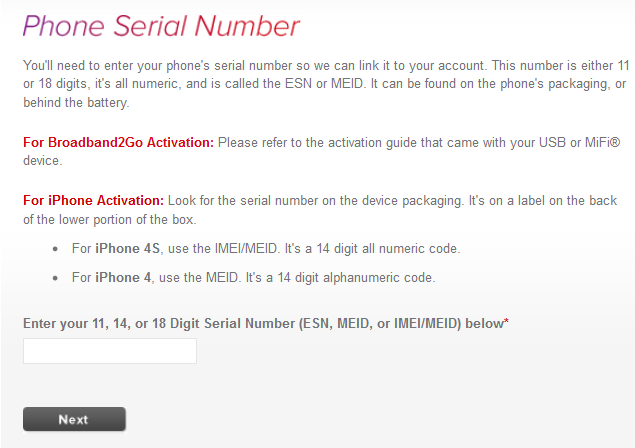
- Hex MEID (where to find this)
- Payment method (credit/debit card, top-up card, or PayPal)
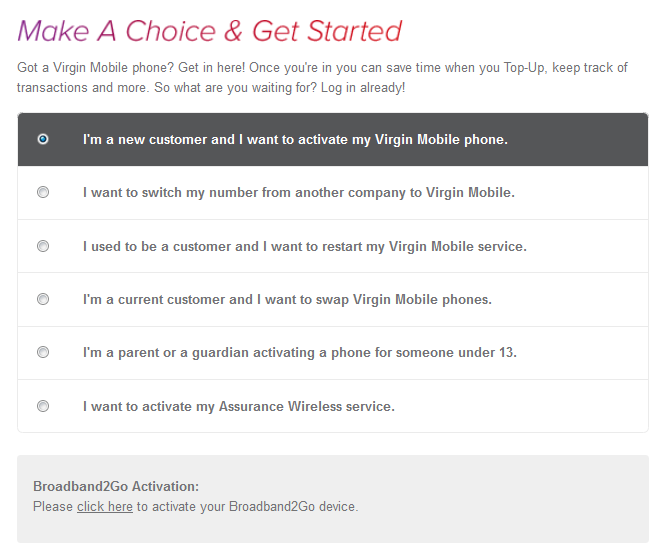
1. From an Internet-connected device (such as your home computer, netbook or tablet), point your browser to Virgin's mobile website and select your country. This takes you to the appropriate local Virgin Mobile website for your location.
2. Select Activate. This is located in different places for each country, so you might want to use your browser's FIND function (Ctrl-F). You are then prompted to select one of the following options. If you are activating a WiFi Mobile Hotspot, STOP HERE. These steps will not work for those devices. Check the documentation that came with your Hotspot. We'll be posting as many as we can in the very near future, so keep your eyes out for that page.
3. Provide the required information on each screen and click. The required information also differs by country. Basically, they want to know who and where you are, and the identity (MEID) of the device you want to activate.
If you forget to fill in a required field, you'll see the same screen. Scroll to the top and read the red messages, which tell you which fields you missed. Once you've provided all the information required by a screen, it will successfully advance to the next screen when you clickagain.
4. A couple of screens later, you'll get a successful activation message. At this point, you can choose to add money to your new account. If you decide to do this, be sure you select the correct payment type and fill in all the required information. Again, you will get a success message once your payment has been recorded by Virgin Mobile.
5. Write down your new MSID & phone number. You'll get a confirmation text message, but it's a good idea to write them down now anyway. Be sure to write down the PIN you chose, as well. Virgin Mobile uses your phone number and PIN to uniquely identify you whenever you have any dealings with them, such as when you call Customer Support.
6. Turn on the device, if it's not already on.
7. From the Home screen, find and press the Activate icon. It looks like a red power button symbol. In a few seconds or so, your device activation will be complete. Another message will appear, this time on your newly-activated device. If you've added money to the account, you can now use your new device.
Congratulations! You have successfully activated your device. Now, go forth and bog it down with apps! Need some suggestions? Check out our list of Must-Have Apps for Android, iPhone/iPad (Coming Soon), and Windows (Coming Soon) devices.
Labels:
activate,
activation,
HowTo,
iPhone,
phone,
smartphone,
Virgin Mobile,
windows phone
Sunday, November 11, 2012
HOW TO: Connect to FREE Hotspots from any WiFi-enabled device
It seems nearly every business and many cities offer free hotspots these days. Connecting to them is not always as straightforward as it might seem, however. We spent many a minute trying to troubleshoot connections before realizing what was going on. Once we figured that out, we came up with the following steps, which we always follow when using someone else's internet connection.
- First, make sure you are connected to the correct hotspot. It doesn't hurt to ask someone for the correct name of the hotspot you wish to use. If it's password protected, make sure you spell it exactly the way it is given to you. Passwords are ALWAYS case-sensitive.
- Next, open a browser to your favorite website. The actual site doesn't matter. It will likely be hijacked by your host. Don't panic. This is normal. Most free hotspots require you to agree to their Terms of Use, and some even require a valid email address, before they will allow you to use their internet connection. Some make you figure out the two-word code before allowing you to proceed. Usually, the host simply wants to make sure you're not a robot and you're not doing something illegal. Some government hosts have more stringent terms, like restricting your use to a specific purpose. We recommend you read the entire user agreement before you click the 'OK' button.
- When the host site does give you the green light, usually a new page welcoming you to their free hotspot site, you are free to move about the cabin. At this point, the host will grant access to your applications. Now's the time to launch the app(s) you want to run.
Sunday, September 23, 2012
SQLite Command Line Syntax
For Android development, SQLite3 is the default database that comes with the Android OS. As such, it's a good idea to know some of the basic commands. We decided to keep them here for a handy reference. Leave us a Comment if we missed something you'd like us to include.
The ADB prompt looks like this.
#
The sqlite3 prompt looks like this.
sqlite>
To connect to a database:
# sqlite3 databasename.db
To list ALL tables in a database:
sqlite> .tables
list ALL tables with names like 'foo' in a database:
sqlite> .tables foo
To show the create commands used to create the tables:
sqlite> .schema
show the create commands used to create a table foo:
sqlite> .schema foo
To set column widths for output:
sqlite> .width col_width1 col_width2 col_width3 ...
HOW TO: Shutdown Windows
Here's an easy way to shutdown your Windows machine.
1. Left-Click on an empty space on the Desktop.
2. Type Alt-F4 to bring up the Shutdown Dialog.
3. Select the type of action you wish to perform: Switch User, LogOff, Restart, Sleep, Hibernate, or Shutdown.
4. Bookmark this page in case you ever forget what to do. <wink>
NOTE: This works on all modern version of Windows: 9x, 2k, XP, Windows7, Windows8, ...
SOLVED: Android Google / Gmail account password reset
[Updated 11 August, 2013]
Not all Android devices provide simple ways to update your Google password, especially if it's your primary account (the one you used when you first configured your device). The Samsung Galaxy series of tablets, for example, provides many options for customizing accounts but seems to hide how to change your password. Some suggestions we found seemed to cause us more trouble and did not resolve the problem. Here is the one that worked for us.
Before following our steps below, check that your Settings are correctly set to sync data. Of course, you would find this under Accounts. If it looks like it's out of sync, try to initiate a sync. That may be all you need to do to fix your password. If not, try this.
1. Launch Gmail and wait for a message to appear.
2. If the message is a prompt for your new password, you're probably good to go (see Note 1 below).
3. If the message is a 'No Connection [ Retry ]' or a timeout, check your Notifications. You're looking for an entry regarding a failed login. Tap this and you'll get the password prompt you've been aching to see.
4. If those don't work, try Settings > Applications > Manage Applications > [ Clear Data ]. Do a PowerOff/PowerOn restart. Launch Gmail. Check your Notifications for a failed login entry. Tap on it and enter your new password.
5. We've seen a couple of instances where the new password didn't work. In this case, we changed the password again and were able to get in with the newest password. It's never happened twice in one session, thankfully.
ALSO TRY:
Change your password using a PC browser, which should force the prompt for your new password from your phone.
If you still can't change your password, you may need to do a Factory Reset.
!!! PAY ATTENTION !!! Make sure you have a good backup before you do this one, as it will wipe all your custom settings and personal data.
NOTE:
If you haven't already set an alternate way to get into your Google account, now's a good time to do it.
Saturday, July 21, 2012
SOLVED: Windows Won't Boot
Problem: Windows won't start!
SYMPTOMS (one or both might occur):
- Windows will not boot.
- Black screen, which might flash occasional glimpses of the "real" desktop (GUI).
- Boot process stops after the CRCDISK.SYS driver loads.
Our MSI motherboard running Vista sometimes has this problem, though we're certain other motherboards and operating system have seen these problems (for instance, Asus or Intel motherboards running Windows XP, Windows 7, Windows 8, or Linux systems like Ubuntu, RedHat, or Suse). Our machine is also a multi-boot machine, though only the Vista partition seems to ever have this issue.
WHAT WE TRIED
Here are some solutions we found elsewhere that either did not work or did not apply to us. We're not saying they don't work. We're saying they don't work for our machine.
Failed Solution 1:
Run the Vista repair disk.
Failed.
Failed Solution 2:
Restore to a previous state didn't work.
Failed.
Failed Solution 3:
Boot in VGA only and change resolutions didn't work.
Failed.
Failed Solution 4:
Locate and delete file(s). Actual filenames vary from post to post. We tried several.
Failed.
Failed Solution 5:
From the Start Menu, run
bootrec.exe /fixmbr
-or-
bootrec.exe /fixboot
Failed.
Failed Solution 6:
Format & reinstall.
While this will work in the short term, it only defers the issue to a later, more inconvenient time. Failed.
WHAT WORKED (a.k.a OUR SOLUTION):
We were able to boot into safe mode. How this is done depends on the operating system.
* Short Answer *
Uninstall and reinstall your graphics drivers.
* Step-by-Step Answer *
Before you begin, locate and make handy all graphics drivers for your system.
1. Login as an Administrator.
2. Click the Start Menu icon (bottom left corner).
3. Select Control Panel (right panel).
4. Choose Device Manager.
5. Double-click on Display Adapters.
6. In our case, our Intel(R) G41 Express Chipset had two entries. This is okay. Our machine has one for VGA and one for HDMI.
7. Uninstall the display driver(s).
8. Reboot.
9. Let your operating system discover the driver(s) automatically. If the OS has trouble finding the correct driver(s), be ready to install them manually.
This solution has worked for us more than once. We hope it works for you, too.
- Beau
SYMPTOMS (one or both might occur):
- Windows will not boot.
- Black screen, which might flash occasional glimpses of the "real" desktop (GUI).
- Boot process stops after the CRCDISK.SYS driver loads.
Our MSI motherboard running Vista sometimes has this problem, though we're certain other motherboards and operating system have seen these problems (for instance, Asus or Intel motherboards running Windows XP, Windows 7, Windows 8, or Linux systems like Ubuntu, RedHat, or Suse). Our machine is also a multi-boot machine, though only the Vista partition seems to ever have this issue.
WHAT WE TRIED
Here are some solutions we found elsewhere that either did not work or did not apply to us. We're not saying they don't work. We're saying they don't work for our machine.
Failed Solution 1:
Run the Vista repair disk.
Failed.
Failed Solution 2:
Restore to a previous state didn't work.
Failed.
Failed Solution 3:
Boot in VGA only and change resolutions didn't work.
Failed.
Failed Solution 4:
Locate and delete file(s)
From the Start Menu, run
bootrec.exe /fixmbr
-or-
Failed.
Failed Solution 6:
Format & reinstall.
While this will work in the short term, it only defers the issue to a later, more inconvenient time.
WHAT WORKED (a.k.a OUR SOLUTION):
We were able to boot into safe mode. How this is done depends on the operating system.
* Short Answer *
Uninstall and reinstall your graphics drivers.
* Step-by-Step Answer *
Before you begin, locate and make handy all graphics drivers for your system.
1. Login as an Administrator.
2. Click the Start Menu icon (bottom left corner).
3. Select Control Panel (right panel).
4. Choose Device Manager.
5. Double-click on Display Adapters.
6. In our case, our Intel(R) G41 Express Chipset had two entries. This is okay. Our machine has one for VGA and one for HDMI.
7. Uninstall the display driver(s).
8. Reboot.
9. Let your operating system discover the driver(s) automatically. If the OS has trouble finding the correct driver(s), be ready to install them manually.
This solution has worked for us more than once. We hope it works for you, too.
Labels:
boot,
Configuration,
crcdisk.sys,
driver,
graphic,
HowTo,
Start Menu,
startup,
Troubleshooting,
Vista,
Windows
Wednesday, June 6, 2012
SOLVED: Project contains R.java error, R.java is missing, R.java not generating
1. Eclipse refuses to generate a new .APK, instead generating a popup chiding you for having the gall to include error(s) in your code, as here.
(X) Your project contains error(s), please fix them before running your application.
2. Your code looks fine. No red stuff anywhere near your files.
3. Travel up the project tree and notice R.java (the automatically generated resource file) is red.
Solution(s):
Basically, Eclipse is telling you there's a problem in a resource file, but it didn't figure this out until you tried to run the code. Follow the red. It's designed to help you locate the source of your pain.
Solution 1:
Be Fearless! Dive into R.java to find the problem. That's right, open it up and look inside. In my case, it was a typographical error (a single tiny tick mark added inadvertently to the end of the text) in the strings.xml file. The offending string was clearly marked in red, so it was trivial to find and fix the typo.
Solution 2:
If that doesn't get you out of your funk, try this. Technically, it deals with a missing R.java file, but the root cause is very similar.
Solution 3:
Here's another idea to try.
Solutions #2 and #3 were found here.
Solution 4:
Watch this video. There's an example of how to generate (and resolve) a similar condition beginning at frame time 20:32. We highly recommend watching the whole series, published on YouTube. It provides a good introduction to Android programming using Java in Eclipse. Thanks, Marakana, for providing an excellent video of your boot camp training class.
Labels:
Android SDK,
Eclipse,
HowTo,
Java,
Troubleshooting Code
Saturday, May 26, 2012
SOLVED: Google Play Store error message No connection [ Retry ]
[Last Updated: 04 March 2015]
You're using your Android device and you know you're connected to the Internet (for instance, your browser works just fine), but you just got this message trying to connect to the Google Play Store. It makes no sense, because you can go right back into the browser and cruise the 'Net as usual. No connection problem there at all! This happens on devices that have never connected to Play as well as those that "used to work fine."
After much head-scratching and muttering, the answer became crystal clear. This is one of those "Doh!" moments, especially if you've done a reset on this device recently. The DATE and TIME are wrong.
Many devices, especially "unconnected" tablets, do not synchronize the internal clock when you perform a reset. Instead, they set the time to a preset date and time. A popular choice, for reasons only known to device manufacturers, is December 31, 1999 at Midnight. Strangely, the Time Zone is often unaffected by a reset.
NOTE: It is not always a good idea to update the original Market app. Some tablets do not work well with the newer Play app. If you've updated your Market app, try removing the update(s) and returning it to the original version that came with your device. If it is again able to reconnect, DO NOT allow it to update EVER!!! Not automatically. Not manually. Not EVER! You will have to go into the settings for the Market app and uncheck the auto-update checkbox. It's not a great solution, as many updates include security patches. It's a trade-off you must be willing to accept if you want to run the Play Store on your device. If you're running AV and Firewall software, you should be fine.
PLEASE DO NOT WRITE US IF YOU HAVE TO REPEATEDLY UNINSTALL AND REINSTALL AFTER YOU UPDATE TO THE PLAY STORE. AS NOTED ABOVE, IF A NEWER VERSION IS INCOMPATIBLE WITH YOUR DEVICE, DO NOT USE IT. INSTEAD, REVERT BACK TO THE ONE THAT WORKS AND KEEP IT THERE.
SAMSUNG GALAXY NOTE & HTC MyTouch users
Some people have commented their devices work, but others are still having problems. If you have resolved your issue on one of these devices, please let us know what you did. If you'd like to help us troubleshoot, please email us. Include as much specific information as you can. We will work with you to resolve this issue for these devices once and for all.
PLAY STORE UPDATE:
In late April, 2013, the Play Store got a makeover. If none of the solutions below have helped you, try a quick update to your Play Store. This is usually done automatically when you try to use the app, but sometimes needs a little help from a desktop login and push to your device. If it's still not connecting properly, simply uninstall the update. No harm, no foul.
Solution 1:
Correct the date and time on your device and try again. You should be able to connect now.
UPDATED! Solution 2:
Go to settings>apps>all scroll to Google Play (or Market or Vendor) and tap clear cache>clear data>force stop. Do the same for tha app called Google Framework (or Google Play Services). Now restart your device and try to connect to the Play Store. Here are links to our sources, Jeffrey and DroidForums.net!
Solution 3:
If you have a device with a Reset (button or hole), try a simple reset. If not, try removing your battery for about half an hour and try again. If you can do neither, let the battery drain completely (until it powers off due to low battery), wait half an hour, then charge it up until it's at least 10% charged before trying again.
Solution 4:
Make sure your router AND modem allow traffic through ports TCP:5228 and UDP:5228, both of which are required for Google Play to work correctly., according to Google. Since your setup is unique, we will not go into the details of how to do this. Check your manuals or ask your local computer expert(s) for advice.
Solution 5:
Edit your hosts file so it's blank / empty. If you've rooted your phone and have a notepad-type app installed, open the file /system/etc/hosts. Highlight and delete anything in that file, then save it. Verify the file was updated. This serves as further confirmation that your device is truly rooted, as the system will only allow user root to update this file.
If your device isn't rooted, you'll need to find an app capable of clearing your hosts file. There are a few good ones out there, so don't despair.
... Thank you, Anonymous!
Solution 6:
Firewall / Router Issues. A couple of our readers found that installing a VPN app allowed them to connect to the Play Store. This is basically an app that makes it easier to get through your firewall, either on your device or on your router. If you can access the firewall logs, look for programs (and on your router, also check for ports & devices) your firewall has blocked. If you see Play, Market, or Vendor in the list, you should add that app to the Allow list. How to do that varies widely from one firewall to another, so we can't provide you with exact instructions. It is typically straightforward and easy to do, however.
Solution 7:
Uninstall any apps you have installed that you don't use anymore. Sometimes, it's simply a matter of apps taking too much room on your device. You can do this quickly and easily using Settings > Applications > Manage Applications. Select the app you want to remove, the choose Uninstall. You will be prompted for confirmation before the app is removed. A few seconds later, you should have more room in your device's internal storage. Of course, if you're using an app that allows you to move your apps to your SD card, the amount of room freed on the internal storage will be much less. In that case, you may need to remove multiple apps.
Solution 8:
If you have changed your Google/Gmail password recently, you will need to update your login password before you can get into the Play Store. Some devices make this easier than others.If you are having trouble figuring out how to update your password, try this article. Sometimes, changing your password will force the issue to correct itself. Be sure to make a note of your new password if you take this path.
Solution 9:
Another of our fabulous readers (the ever-popular and prolific Anonymous from the comments below) found that if you have installed the "Freedom" app, try restarting or uninstalling/reinstalling that app. Any app that temporarily blocks the Internet (your Firewall or your phone's built-in Airplane Mode setting) either partially or completely, should be tested to see if it is interfering with your ability to connect. Do this by stopping, disabling, or uninstalling it. Just remember to turn your Firewall back on when you are done!
Solution 10:
If your device is a cellular telephone, have your Internet carrier's Tech Support Experts check that your phone is fully synchronized with their system. We recently had a prepaid phone with this problem and ended up calling our carrier. Apparently, the phone was only partially sync'ed with their system. We could do some simple accesses, but most browsing and Play Store accesses were out of the question. Most sites would not load completely, and we often saw "Server Not Found" errors. One tech wanted to replace the phone, but we weren't convinced a replacement phone was the answer. An account reset worked as a short term answer, but the problem resurfaced the next month. A second set of eyes the next month revealed the phone was out-of-sync with their system. The tech did some reprogramming (with the phone off). After a couple of months without seeing the issue again, we've pronounced it fixed.. Thanks a million, Julie!!!
IF THE ABOVE STEPS DON'T WORK FOR YOU, try managing your apps from within a browser until such time as we have found the solution that works for you. We will write up how to do that and add a link here when it's ready for you.
STILL NOT WORKING?
We're sorry to hear that. We are all scratching our heads trying to determine what else we've missed. Please help us figure out what's going on. Click here and provide us with detailed information about your device: device make/model/size, operating system/version, and anything else you think might help. We will continue to research it and let you know as soon as we have an answer. In the meantime, please support our site so we can continue to provide you with quality solutions such as this. Oh, and be sure to check back here occasionally. We will continue to update as new ideas and possible solutions come to light.
BTW, if you're using Firefox, you can use the Add-On 'Check4Change' to monitor this article for changes. The "Last Updated" line above is an excellent selection, as we change that line every time we touch an article.
You're using your Android device and you know you're connected to the Internet (for instance, your browser works just fine), but you just got this message trying to connect to the Google Play Store. It makes no sense, because you can go right back into the browser and cruise the 'Net as usual. No connection problem there at all! This happens on devices that have never connected to Play as well as those that "used to work fine."
After much head-scratching and muttering, the answer became crystal clear. This is one of those "Doh!" moments, especially if you've done a reset on this device recently. The DATE and TIME are wrong.
Many devices, especially "unconnected" tablets, do not synchronize the internal clock when you perform a reset. Instead, they set the time to a preset date and time. A popular choice, for reasons only known to device manufacturers, is December 31, 1999 at Midnight. Strangely, the Time Zone is often unaffected by a reset.
NOTE: It is not always a good idea to update the original Market app. Some tablets do not work well with the newer Play app. If you've updated your Market app, try removing the update(s) and returning it to the original version that came with your device. If it is again able to reconnect, DO NOT allow it to update EVER!!! Not automatically. Not manually. Not EVER! You will have to go into the settings for the Market app and uncheck the auto-update checkbox. It's not a great solution, as many updates include security patches. It's a trade-off you must be willing to accept if you want to run the Play Store on your device. If you're running AV and Firewall software, you should be fine.
PLEASE DO NOT WRITE US IF YOU HAVE TO REPEATEDLY UNINSTALL AND REINSTALL AFTER YOU UPDATE TO THE PLAY STORE. AS NOTED ABOVE, IF A NEWER VERSION IS INCOMPATIBLE WITH YOUR DEVICE, DO NOT USE IT. INSTEAD, REVERT BACK TO THE ONE THAT WORKS AND KEEP IT THERE.
!!! KEEP THE VERSION THAT WORKS !!!
Some people have commented their devices work, but others are still having problems. If you have resolved your issue on one of these devices, please let us know what you did. If you'd like to help us troubleshoot, please email us. Include as much specific information as you can. We will work with you to resolve this issue for these devices once and for all.
PLAY STORE UPDATE:
In late April, 2013, the Play Store got a makeover. If none of the solutions below have helped you, try a quick update to your Play Store. This is usually done automatically when you try to use the app, but sometimes needs a little help from a desktop login and push to your device. If it's still not connecting properly, simply uninstall the update. No harm, no foul.
Solution 1:
Correct the date and time on your device and try again. You should be able to connect now.
UPDATED! Solution 2:
Go to settings>apps>all scroll to Google Play (or Market or Vendor) and tap clear cache>clear data>force stop. Do the same for tha app called Google Framework (or Google Play Services). Now restart your device and try to connect to the Play Store. Here are links to our sources, Jeffrey and DroidForums.net!
Solution 3:
If you have a device with a Reset (button or hole), try a simple reset. If not, try removing your battery for about half an hour and try again. If you can do neither, let the battery drain completely (until it powers off due to low battery), wait half an hour, then charge it up until it's at least 10% charged before trying again.
Solution 4:
Make sure your router AND modem allow traffic through ports TCP:5228 and UDP:5228, both of which are required for Google Play to work correctly., according to Google. Since your setup is unique, we will not go into the details of how to do this. Check your manuals or ask your local computer expert(s) for advice.
Solution 5:
Edit your hosts file so it's blank / empty. If you've rooted your phone and have a notepad-type app installed, open the file /system/etc/hosts. Highlight and delete anything in that file, then save it. Verify the file was updated. This serves as further confirmation that your device is truly rooted, as the system will only allow user root to update this file.
If your device isn't rooted, you'll need to find an app capable of clearing your hosts file. There are a few good ones out there, so don't despair.
... Thank you, Anonymous!
Solution 6:
Firewall / Router Issues. A couple of our readers found that installing a VPN app allowed them to connect to the Play Store. This is basically an app that makes it easier to get through your firewall, either on your device or on your router. If you can access the firewall logs, look for programs (and on your router, also check for ports & devices) your firewall has blocked. If you see Play, Market, or Vendor in the list, you should add that app to the Allow list. How to do that varies widely from one firewall to another, so we can't provide you with exact instructions. It is typically straightforward and easy to do, however.
Solution 7:
Uninstall any apps you have installed that you don't use anymore. Sometimes, it's simply a matter of apps taking too much room on your device. You can do this quickly and easily using Settings > Applications > Manage Applications. Select the app you want to remove, the choose Uninstall. You will be prompted for confirmation before the app is removed. A few seconds later, you should have more room in your device's internal storage. Of course, if you're using an app that allows you to move your apps to your SD card, the amount of room freed on the internal storage will be much less. In that case, you may need to remove multiple apps.
Solution 8:
If you have changed your Google/Gmail password recently, you will need to update your login password before you can get into the Play Store. Some devices make this easier than others.If you are having trouble figuring out how to update your password, try this article. Sometimes, changing your password will force the issue to correct itself. Be sure to make a note of your new password if you take this path.
Solution 9:
Another of our fabulous readers (the ever-popular and prolific Anonymous from the comments below) found that if you have installed the "Freedom" app, try restarting or uninstalling/reinstalling that app. Any app that temporarily blocks the Internet (your Firewall or your phone's built-in Airplane Mode setting) either partially or completely, should be tested to see if it is interfering with your ability to connect. Do this by stopping, disabling, or uninstalling it. Just remember to turn your Firewall back on when you are done!
Solution 10:
If your device is a cellular telephone, have your Internet carrier's Tech Support Experts check that your phone is fully synchronized with their system. We recently had a prepaid phone with this problem and ended up calling our carrier. Apparently, the phone was only partially sync'ed with their system. We could do some simple accesses, but most browsing and Play Store accesses were out of the question. Most sites would not load completely, and we often saw "Server Not Found" errors. One tech wanted to replace the phone, but we weren't convinced a replacement phone was the answer. An account reset worked as a short term answer, but the problem resurfaced the next month. A second set of eyes the next month revealed the phone was out-of-sync with their system. The tech did some reprogramming (with the phone off). After a couple of months without seeing the issue again, we've pronounced it fixed.. Thanks a million, Julie!!!
IF THE ABOVE STEPS DON'T WORK FOR YOU, try managing your apps from within a browser until such time as we have found the solution that works for you. We will write up how to do that and add a link here when it's ready for you.
STILL NOT WORKING?
We're sorry to hear that. We are all scratching our heads trying to determine what else we've missed. Please help us figure out what's going on. Click here and provide us with detailed information about your device: device make/model/size, operating system/version, and anything else you think might help. We will continue to research it and let you know as soon as we have an answer. In the meantime, please support our site so we can continue to provide you with quality solutions such as this. Oh, and be sure to check back here occasionally. We will continue to update as new ideas and possible solutions come to light.
BTW, if you're using Firefox, you can use the Add-On 'Check4Change' to monitor this article for changes. The "Last Updated" line above is an excellent selection, as we change that line every time we touch an article.
Labels:
ADB,
Android,
Android Market,
Firewall,
Freedom,
HowTo,
No connection,
Play,
Play Store,
Solved,
Tablet,
Troubleshooting
Sunday, April 29, 2012
TIP: Location of Windows 7 Start Menu Files
[Updated 11 Dec 2012]
As is often the case with a new Windows release, the file structure has changed again with Windows 7. If you need to tweak the Start Menu, it has again been relocated.
It's in such an odd place, it seems every time we need to make a change, we have to relearn where it is. Below, we give the Start Menu locations for individual accounts and for the master Start Menu, which includes menu items you wish to display for all users.
If you want to change the Start Menu for one user only:
C:\Users\[username]\AppData\Roaming\Microsoft\Windows\Start Menu\Programs\
If you want to change the Start Menu for all users on your machine:
C:\ProgramData\Microsoft\Windows\Start Menu\Programs\
Before you move on, please +1, bookmark, and/or link back to this article so you can keep it handy.
Labels:
All Programs,
Configuration,
Customization,
Directory,
File Structure,
Menu,
Start Menu,
Tweak,
UI,
Windows 7,
Windows7
Wednesday, April 18, 2012
HOW TO: (Android) Rotate the Screen on your Emulator
Want to see what your layout looks like when rotated 90ยบ?
Use [Cntl] + [F11]
Use [Cntl] + [F11]
HOW TO: Create a New Thread in Java
Here's how to create a new Thread.
new Thread() {
public void run() {
// insert code to be done by new thread here
}
}.start();
new Thread() {
public void run() {
// insert code to be done by new thread here
}
}.start();
TERMINAL TIP: Handy ADB Commands (Android Debug Bridge)
Here are some very useful commands. To use them, you must have installed the Android SDK (Software Development Kit), which includes the command line tool ADB. When you have installed it, you can then open a Windows command window.
adb devices lists connected devices
adb [-d | -e] shell connects terminal mini-bash shell to device (-d) or emulator (-e)
Once in the debug shell, try these commands
kill-server cuts connection to emulator
start-server [re-]connects eclipse to emulator
logcat displays running log in a terminal windows
logcat TAG:* *:S filtered: TAG:* = only show all TAG entries; *:S = all others Silent
[ TAG corresponds to Log.d(TAG, "msg"); in .java code ]
input keyevent 82 unlocks screen of connected device
Labels:
ADB,
Android SDK,
command line,
Eclipse,
Java,
Troubleshooting Code,
unlock screen
HOW TO: Add a Menu for an Android App using Java in Eclipse
These are the steps needed in order to add a menu.
1. File > New > class: BaseActivity
2. Modify to read "BaseActivity extends Activity"
3. CTL-SHFT-O Organize Imports
4. [HoverOver] Click: Add unimplemented methods
5. Put common functionality such as menu items here
7. As you add menu items, add functionality as part of a CASE: statement
8. File > New > Android XML file > menu.xml
9. Make sure you set the icon property in the menu.xml
10. Update Android.manifest
11. Update new child activity pages like this: NameOfActivity extends BaseActivity
Saturday, April 14, 2012
HOW TO: Add a Resource Library in Eclipse
To add a new resource library file into your project, follow these simple steps.
- Drop the file into your project's root directory
- Open Package Explorer
- Right-Click on the project name
- Select 'Refresh' (or press F5)
- Right-Click on project name
- Select 'Properties'
- Select 'Java Build Path'
- Select 'Libraries'
- Select 'Add JARs'
- Select 'Refresh' (or press F5)
SOLVED: R.layout.main cannot be resolved to a variable
This is a misleading error message. A telltale symptom is your class file contains
import android.R; in your imports list. Remove this line, then look for the real cause of the error message.
More than likely, there is an error in a /res file preventing the project's 'R' file from being generated. If Eclipse can't find one, it will use Android's 'R' file. Check your /res folder for errors (red icons indicate errors). Finding the root cause might not be easy, but once you find and fix the error (and save it), a new 'R' file will be automatically generated.
When that happens, all should again be well with your code.
Labels:
Android SDK,
Eclipse,
IDE Errors,
Java,
Troubleshooting Code
SOLVED: Eclipse Update - Connection refused (https://dl-ssl.google.com/android/repository/)
[Updated 28 January 2013]
Every time I try to update Eclipse, I get a variation of this error message.
Connection refused (https://dl-ssl.google.com/android/repository/)
There are several solutions to this issue. Google recommends using the non-secure variant of the repository address, http://dl-ssl.google.com/android/repository/, but I no longer travel this road. I've discovered that once I get the parameters correct for the non-secure site, the secure site will also work. To me, this just means an extra, unnecessary step. Since I prefer using the secure connection, I simply skip down to my short list, provided below, of things that might work. Sometimes, it requires a combination of solutions in order to update correctly. Persistence will pay off!
SOLUTION 1:
Make sure your firewall is set to allow Java, Eclipse, and Android SDK to get out and check for updates (preferred) ... OR turn it off (much more risky).
SOLUTION 2:
Check the URL you're using against the one published on the Android site. The address changes sometimes, so make sure it's the latest one. If it's different, you can try simply updating the address, but your best bet is to update the SDK.
SOLUTION 3:
Try a different network environment.
In certain recent versions of the Windows environment, the SDK Manager must be RUNAS the system administrator (not just any old administrator) as a standalone. This will, by virtue of the relationship between the SDK and Eclipse, update the appropriate add-ons in Eclipse. If you use this solution all the time, you should remove the address from Eclipse's add-ons repository list.
SOLUTION 4:
If you use a proxy server, try this. If not, skip to the next solution.
1. Open a command prompt or terminal window
2. Navigate to the directory in which android.bat resides (the SDK install location)
3. Backup android.bat (in case this fix doesn't work, you will need to revert to the original)
4. Locate the line (near the bottom, very long) that contains %REMOTE_DEBUG%
5. Add the following parameters, using actual values
* Replace [myProxyServer] with the name of your proxy server
* Replace [myProxyPort] with the port number your proxy server uses
-DproxyHost=[myproxyserver] -DproxyPort=[myProxyPort]
6. Save the new android.bat file
7. Restart SDK Manager
8. If problem persists, remove the new android.bat file and restore the original file
SOLUTION 5: For Mac users (may work for other platforms, too)
When the error occurs, click CANCEL, then Update SDK Manager, then Restart SDK Manager.
SOLUTION 6:
Take a look at this post for new ideas. A couple of the solutions in this list were gleaned from here. If you find one that works that's not in this list, please let us know by leaving a comment below.
http://code.google.com/p/android/issues/detail?id=21359
SOLUTION 7: (aka The Last Resort)
Uninstall/Reinstall latest Eclipse _AND_ Android SDK.
28 January 2013
For a recent Tools update, I kept getting a message from Android SDK that the ...\tools directory was in use. Of course, as dumb as it sounds, the program that had locked this directory was the very same Android SDK!!! Here's how I fixed that.
1. Close Eclipse and Android SDK, if running.
2. Manually rename the \tools directory to the destination folder name in the error message. In my case it was ToolPackage.old02.
3. Move the renamed folder via DragNDrop into the ...\temp folder.
4. I found the new version tools_rXX-windows.zip in my ...\temp directory & extracted the tools directory in the SDK root directory.
For example, the newly extracted folder on my Windows 7 machine is c:\Dev\android-sdk-windows\tools.
Labels:
Android SDK,
Eclipse,
IDE Errors,
Java
Subscribe to:
Posts (Atom)